FAQ >> Getting Started Guide

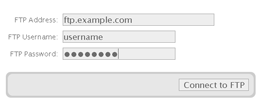
'Account Set-Up' Step BarYou will update this URL once you have installed the API but for the initial set-up we only need your basic web site address. For example: http://example.com/ or https://www.example.org/ Once you have entered your domain simply select the 'Add Domain' button. There are two methods of installing the API; 'Automatic Installation' and 'Manual Installation'. Automatic Installation To use the automatic installation process simply go to the 'Domains' section, go to the 'API' section for your domain and select the 'Automatic Installation' option. You will then be prompted to enter your FTP login details for your web site. Simply enter your FTP address, username and password and select the 'Connect to FTP' button and myRepono will connect to your FTP account. At this stage no actions are taken, myRepono simply verifies your FTP details are correct and it attempts to locate where it should install the API (you approve the location in the next step). 
Automatic FTP InstallationOnce your FTP details have been verified myRepono will suggest a location where the API PHP (myrepono.php) should be installed. Please check and confirm the path is correct, then select the 'Install API' button. This action will only create the specified directory (usually called /myrepono/), a file called myrepono.php in the specified directory, and a directory called /data/ in the specified directory. If you already have a file called myrepono.php in a /myrepono/ directory then the confirmation message will inform you of this and will suggest an alternative location or allow you to overwrite the file. Once you have selected the 'Install API' button you should be shown a success message (if not, please follow the error messages and contact us if you can not resolve the issue). You will also be shown your 'API Status' which indicates whether or not myRepono has been able to connect to the API on your web site. If the API status is not successful then please check the API URL shown below and confirm it does reflect the correct location where the API has been installed. Upon confirmation you will be returned to the API configuration section for your domain. Assuming the API has been installed correctly this should now show an 'API Connected' message indicating the API is installed correctly. Please refer to the 'API Installation Errors and Trouble-Shooting' section below for assistance with any API errors. You can also use the API Debugging Tool (listed under the automatic and manual installation methods) to identify issues with your API installation. Manual Installation To use the manual installation process simply go to the 'Domains' section, go to the 'API' section for your domain and select the 'Manual Installation' option. You will then be prompted to download the myRepono API PHP script. Select this option and download the API to your computer. Note, you do not need to modify this file in any way, it is already configured for your domain. Once you have downloaded the API, simply upload it to a directory on your web site. We recommend calling this directory /myrepono/ and placing it in the root of the domain (e.g. http://www.domain.com/myrepono/). You can upload the file using your online file manager and web site design software, though ideally we recommend you use a FTP program such as Filezilla, CuteFTP or WSFTP, many modern web browsers also include FTP programs. Note, the file should be uploaded in ASCII mode. Please refer to your web hosts documentation for any specific PHP installation requirements. Once you have uploaded the API, simply update the 'API URL' to reflect the location of the API and select the 'Save API URL' button. Upon updating the API URL you will be returned to the API configuration section for your domain. Assuming the API has been installed correctly this should now show an 'API Connected' message indicating the API is installed correctly. The API will attempt to automatically create a directory called /data/ within your /myrepono/ API directory, however we recommend you create this directory in case the API is unable to do so. The API data directory should be called /data/ and should be located in the same directory as the myrepono.php script, therefore it's path will be similar to /myrepono/data/. The API data directory must be writable, therefore we recommend setting the permissions/CHMOD on the /data/ directory to 777 or 755. Once you have successfully configured the API the 'Account Set-Up' step bar will be updated to show 'Step 1' is 'Done'. You may now select the second step to proceed to configuring your file and database backups. API Installation Errors and Trouble-Shooting If the API does not connect correctly, please try visiting your API URL using your web browser. The API should return a '0', if it returns any other text or errors then an error has occurred. The API data directory must be writable so the myRepono API can create temporary files, if your backup process fails please try setting your API data directory (/myrepono/data/) permissions to 777, and your API directory (/myrepono/) permissions to 755, and then visit the API URL in your web browser. If the URL returns anything except a '0', please try running an API debugging test, if this does not enable you to identify the issue, please contact us. For further guidance resolving API installation errors, please refer to our API Installation Errors and Trouble-Shooting documentation. If the API returns a '0' correctly but the myRepono system returns an API error, or if you have any other questions, please contact us. 
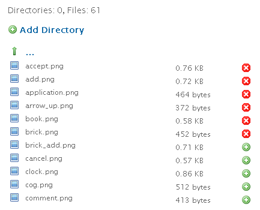
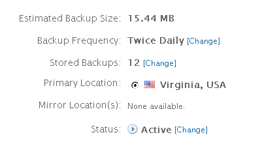
Backup File SelectionOnce you have moved to another directory you can select the 'Add Directory' option to add all the complete directory/folder to your backup list, alternative you may select the green 'plus' icons to add an individual file or directory to the backup list, you can then select the red 'minus' icons to remove files and directories. Once you have selected the files you would like to backup you can select the 'Databases' tab to move to the database backup configuration. For guidance configuration databases, please refer to the Domains: Databases documentation. Once you have successfully configured your backup files the 'Account Set-Up' step bar will be updated to show 'Step 2' is 'Done'. You may now select the third step to proceed to configure and activate your backups. To activate your backups and begin backing up your selected files simply update the 'Status' option to be 'Active' by selecting the '[Change]' link next to the status. Once the status is set correctly simply select the 'Save Settings' button. Your backups will now be scheduled to be backed up, your first backup will be taken within approximately 60 minutes, though often within a few minutes. The settings section also allows you to customise various settings associated to your backups, including how often you would like your backups to be processed and how many backups you would like to store. Simply customise the settings as you require and select the 'Save Settings' options. The domain settings section also allows you to add multiple domain profiles. Please do not add any additional domain profiles until your API is installed correctly and your first backup for your 1st profile has been created successfully. You can update your configuration and settings at any time, and you can add additional domains by going to the 'Domains' section and selecting 'Add New Domain'. To customise your account settings and notifications simply go to the 'Settings' tab. |
|
Did you find this page helpful?
|
Related Articles
- API Configuration & Customisation (v1.4)
- API Installation Errors and Trouble-Shooting
- API Requirements
- Definitions: API, PHP, FTP, mySQL and more.
- Domains
- Domains: Add Domain
- Domains: API
- Domains: Databases
- Domains: Delete
- Domains: Files
- Domains: Overview
- Domains: Settings
- Domains: Settings: Domain Profiles
- WordPress Backup Plugin Installation Instructions
- Failed Backup Errors and Trouble-Shooting


