FAQ >> Backups: Restore Backup: Manual Restoration
Downloading and Accessing Your Backup

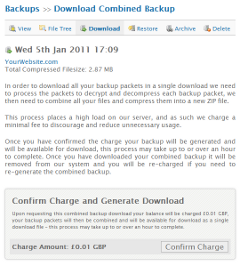
Backups: Download Combined Backup
To download your backup firstly select the appropriate backup in the 'Backups' section of your account and then proceed to the 'Download' section. You can either download your backup packets individually, or alternatively you can generate a combined backup download to download all your backups packets as a single ZIP file.
Your backup downloads are ZIP archive files which contain multiple files, these ZIP files must be opened with suitable software in order to extract the individual files contained within the ZIP archive.
We strongly recommend using WinRAR or WinZIP to access all ZIP files generated by the myRepono system, WinRAR can be downloaded free of charge at: http://www.rarlab.com/
File Restoration Method 1. Extract Files Locally & Upload via FTP
Open each of your backup ZIP files using suitable software such as WinRAR and then select to extract the files to a local directory on your computer. Once done you should have a complete copy of your backup in a single directory on your computer and the files/directories should be structured as they are within your backup ZIP file and on your website.
Once you have extracted the necessary files simply upload them to your website using FTP software, or an online file manager.
File Restoration Method 2. Upload via FTP & Extract Files on Server
If you have access to your web server's command-line (e.g. via SSH or telnet) and are able to execute commands then you can simplify the restoration process by uploading the backup ZIP files and then extracting them on your web server, rather than uploading all the files individually via FTP.
Once you have uploaded your ZIP files simply access the command-line and use an appropriate ZIP program to extract the files from the ZIP file.
Unix/Linux web server users should be able to use the following command to extract the files from their ZIP file:
unzip BACKUP-FILENAME.zip
The following command can be used to list the files contained in your ZIP file:
unzip -l BACKUP-FILENAME.zip
If you have any difficulty extracting the ZIP files you can use the following command to repair them:
zip -F BACKUP-FILENAME.zip
Once you have extracted your files simply verify they are located in the correct location - you can use the 'cp' or 'mv' commands to copy/move your data as you require.
Database Restoration Method 1. Import SQL Files Using a mySQL Management Tool
Your database backups are generated as SQL files which will be located within your API data directory in your backups. Your database backups are split into SQL files which are included in your first backup packet, if you have enough SQL backups then the files will continue in your second backup packet, and so on. If your database table is particular large then your SQL backup will be split into multiple files, in this case it is critical you select all of the associated SQL files. For more information, please see our How are mySQL database backups generated documentation.
Most hosting providers offer some form of mySQL management tool as part of their control panel, the most common software for this purpose is phpMyAdmin which is a powerful and open-source mySQL management tool. phpMyAdmin can be downloaded free of charge at: http://www.phpmyadmin.net/

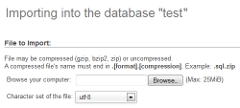
phpMyAdmin: Import SQL File
Once you have located your SQL files simply log-in to your mySQL control panel and select the database you would like to import your SQL backups into, if the database has existing data please use the 'Export' feature to take a backup before using the 'Empty' feature to remove any existing data from the database tables you would like to restore (you can 'Drop' the tables if you would prefer, and this should be done if the table structure has changed).
Once you have selected and prepared the appropriate database simply proceed to the 'Import' or 'SQL' section and select to upload your first SQL file, once selected simply proceed with the import process. This process must be repeated for all your SQL files, ensuring all the SQL files are imported in alphabetical order.
Database Restoration Method 2. Import SQL Files Using Command-Line mySQL
If you have access to your web server's command-line (e.g. via SSH or telnet) and are able to execute commands then you can simplify the database restoration process by importing the SQL files using command-line mySQL.
Unix/Linux web server users should be able to use the following command to import their SQL files:
mysql -h DB_HOST -u DB_USERNAME -p DB_NAME < BACKUP-FILENAME.sql
Note, you must replace the 'DB_HOST', 'DB_USERNAME', 'DB_NAME' and 'BACKUP-FILENAME.sql' values with the appropriate values for your database and SQL file, for example:
mysql -h localhost -u username -p database < BACKUP-FILENAME.sql
Also note, the '-p' option/flag will cause mySQL to prompt you to enter your database password.
Combining Database Backup SQL Files
If you have a large number of SQL files which will be time-consuming to import individually then it is possible to combine your SQL files using Windows or Unix/Linux command line tools.
If you are using a Windows computer/server you can run the following command via Windows command line to combine your SQL files:
copy BACKUP-*.sql COMBINED.sql
If you are using a Unix/Linux computer/server you can run the following command to combine your SQL files:
cat BACKUP-*.sql > COMBINED.sql
These commands will take all files in the current directory which begin with 'BACKUP-' and have the file extension '.sql', and will combine all the files into a single file called 'COMBINED.sql'.
Note, you must navigate to the correct directory before running these commands, and please ensure you do not adjust the 'COMBINED.sql' filename to begin with 'BACKUP-' as this would cause the result file to be included and therefore may result in an endless loop process.
Did you find this page helpful?
 Yes Yes
 No No

|
Related Articles
|


