FAQ >> Backups: Restore Backup
Starting Your Restoration
To begin the restoration process simply locate a suitable backup via the 'Backups' section of your account and then select the 'Restore' option. After selecting a backup to restore you will be shown the 'Restore Backup' section which will provide two options allowing you to 'Select Files to Restore' or to 'Restore All Files'. Please select the 'Restore All Files' option if you would like to restore the complete backup as quickly as possible.
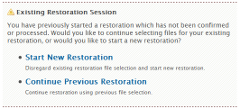
Existing Restoration Session
If you have previously processed a restoration for the same domain then the restoration system will notify you of the existing restoration session and will provide you with options to start a new restoration session, continue the existing restoration session, or to view the existing restoration status. If starting a new session then your existing file selections and restoration log will be removed, alternatively you can continue the session to use an existing file selection. Starting a new restoration session while an existing restoration is in progress will cause the existing restoration process to be stopped/cancelled.
Restoration File Selection
The restoration file selection section allows you to select which files and database tables you would like to backup. Four file selection methods are included, these are 'File Tree', 'Databases', 'Backup Packets' and 'Search'.
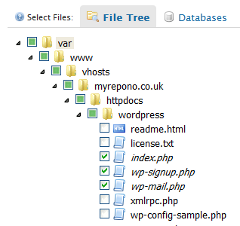
File Tree Selection
File Tree
The file tree selection method allows you to view all your backup files in a directory tree, enabling you to easily browse your files to select specific files and directories for restoration. Simply select the checkboxes next to each file/directory to add them to the 'Items to Restore' list shown on the right, to expand a directory simply click on the directory name or icon. Checkboxes will be indicated as being 'partially selected' whenever a file is selected within a directory but the entire contents of the directory is not selected. Please note, for efficiency reasons the file tree may not show a directory as being 'partially selected' when refreshing the file tree if the selected files are within multiple levels of sub-directories - simply expand the directory to verify your files are selected correctly.
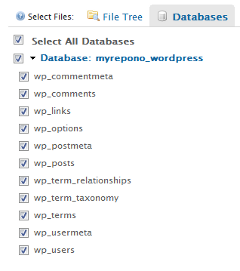
Databases Selection
Databases
The databases selection method lists your database table backups, simply select the relevant checkbox to add the required database or database table to your 'Items to Restore'. If your database table backup is split into multiple SQL files then the databases selection method will automatically select all associated SQL files for each database table.
Backup Packets
The backup packets selection method allows you to select your individual backup packets for restoration, and enables you to view your files organised by the backup packets they are stored in.
Search
The search selection method allows you to search your backup for specific files or directories. Searches use a partial match compared against the full file path for each file, therefore searching for 'example', '.php', '/public_html/' and 'home/username' would all return the file '/home/username/public_html/example.php'.
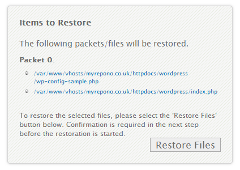
Items to Restore
Once you have selected your files to restore they will be listed in the 'Items to Restore' section on the right of the 'Restore Backup' page, simply select the 'Restore Files' option to proceed with the restoration. Selecting the 'Restore Files' button will take you to the restoration confirmation section - it will not start the restoration process. Please be patient when selecting files and always wait for the 'Loading...' message shown in the bottom left of the page to disappear before selecting the 'Restore Files' option.
Note, your database backups are split into SQL files which are included in your first backup packet, if you have enough SQL backups then the files will continue in your second backup packet, and so on. SQL backup files should be selected in the same way as files, however if your database table is particular large then your SQL backup will be split into multiple files, in this case it is critical you select all of the associated SQL files. The databases selection method will automatically select all the appropriate SQL files for each database table. For more information, please see our How are mySQL database backups generated documentation.
Please also note, when processing your restoration the files you have selected for restoration will be created on your website, or if they already exist the existing versions will be overwritten - the restoration system will not delete any files. Therefore, if your website has been infected with 'malware' which has created new files, or if disruption to your website is being caused by a file which you are not restoring, then these files must be deleted manually.
Restoration Confirmation
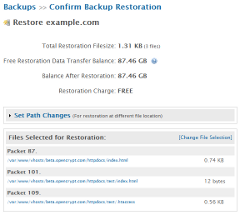
Confirm Backup Restoration
After selecting 'Restore Files' you will be shown a 'Confirm Backup Restoration' page listing your files to be restored, along with details about the total restoration filesize and any applicable restoration charges. All users receive a 'Free Restoration Data Transfer Balance' enabling them to restore data free of charge. For more information, please see our Free Restoration Data Transfer Balance documentation.
When viewing the 'Confirm Backup Restoration' section you will notice a 'Start Restoration' button to the right of the page which must be selected to confirm and proceed with the restoration - once the 'Start Restoration' button is selected your restoration will begin and you will be shown the progress of your restoration.
You will also notice a 'Set Path Changes' option which allows you to apply changes to the restoration file paths, enabling you to restore files and database tables to different locations. For documentation regarding the 'Set Path Changes' option, please see our Backups: Restore Backup: Path Changes documentation.
If you have selected to restore any databases which are not configured in the 'Domains' -> 'Databases' section you will be prompted to select which database you would like to restore each database backup to, you can either select an existing database configuration or alternatively you can add a new database configuration.
Restoration Status and Summary
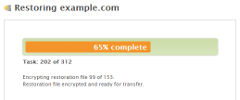
Process Backup Restoration
Once you have selected the 'Start Restoration' button your restoration will begin processing and you will be shown a progress bar with task information. To the right of the page you will be shown a 'Restoration Log' which includes detailed information about your restoration, including details of any failed restoration tasks.
The restoration process is run by the myRepono system and is not reliant on your web browser. If you close your browser your restoration will continue processing and you can return to view your restoration status using the URL provided on the restoration status page, or by navigating to restore the same backup again and selecting the 'View Restoration Status' option. While your restoration is in progress a notification will be shown in the top right of the myRepono system which also includes a link to view the restoration status.
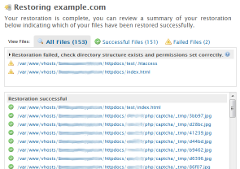
Restoration Summary
Once your restoration is complete you will be shown a summary of your restoration identifying which of your files have been restored successfully, and any which have not. If a restoration error is unclear, simply select the help icon to display a description of the error.
At the bottom of the restoration summary you will be provided with two options enabling you to restart your restoration using the current file selection, or alternatively you can choose to restart your restoration using only the selected files which were not restored successfully which enables you to quickly re-attempt any failed file restorations.
Restoration Errors and Trouble-Shooting
The restoration system may indicate your files could not be restored for a number of reasons as outlined below.
Unable to authenticate connection.
Please verify your API is installed correctly using the API Debugging Tool.
Invalid restoration request.
Please ensure you have the latest API version installed and verify your API is installed correctly using the API Debugging Tool.
Restoration packet checksum failed.
An error may have occurred during the file transfer stage. Please re-attempt the restoration process, if problems persist please download the relevant files and attempt manual restoration. If this issue affects a large number of your files, please contact support.
Restoration failed, check directory structure exists and permissions set correctly.
Please verify your directory structure exists and that it is writable (permissions/CHMOD set to 777). If your directory structure does not exist, please set the permissions/CHMOD on the parent directory to 777 so your API may create the directory structure. Note, some servers do not permit the API to run within directories which have their permissions set to 777, in this case please try setting the permissions to 775 or 755. If problems persist, please manually create the first level of directories and set their permissions to 777, ensuring the directories which contain your myRepono API have their permissions set to 755.
Could not decrypt packet.
An error may have occurred during the file decryption stage. Please re-attempt the restoration process, if problems persist please download the relevant files and attempt manual restoration. If this issue affects a large number of your files, please contact support.
API could not retrieve valid database details, execute SQL failed.
Please proceed to the Databases section to verify the database details you have configured are correct. Please ensure you have the latest API version installed and verify your API is installed correctly using the API Debugging Tool.
API could not connect to database, execute SQL failed.
Please proceed to the Databases section to verify the database details you have configured are correct. Please ensure you have the latest API version installed and verify your API is installed correctly using the API Debugging Tool.
API could not select database, execute SQL failed.
Please proceed to the Databases section to verify the database details you have configured are correct. Note, the restoration process can only re-create your database table structure, it can not re-create your database and therefore the database must already exist. You can re-create your database using your web hosting control panel or command-line mySQL.
API could not execute SQL.
Please verify your existing database tables have been emptied before proceeding with your restoration, the restoration process will not empty database tables which are not already selected for backup and therefore the restoration process may be attempting to create database records which already exist. If your database tables are empty or non-existent and this issue persists, please verify the validity of your SQL files and attempt a manual import using a mySQL control panel such as phpMyAdmin, or command-line mySQL. If problems persist, please contact support.
API could not process SQL restore.
Your API is unable to download and execute your SQL files. Please ensure you have the latest API version installed and verify your API is installed correctly using the API Debugging Tool. Please verify the validity of your SQL files and attempt a manual import using a mySQL control panel such as phpMyAdmin, or command-line mySQL. If problems persist, please contact support.
Website Migration/Transfer
The myRepono restoration system can be used to migrate/transfer your website between hosting accounts or servers.
Once you have successfully backed up your 'old' website please Install the myRepono API on your 'new' website. When installing the API you can either add a new domain configuration for the 'new' website, or you can update your current domain configuration to connect to the API on the 'new' website.
If adding a new domain then you will need to use the 'Transfer Backup' feature to transfer your backup from your 'old' website's domain configuration to the 'new' website's domain configuration in your myRepono account. To do this simply select to restore your backup and you will then notice a 'Transfer Backup' option shown on the right of the 'Restore Backup' section.
Once the API is installed on your new website and you have transferred your backup as necessary, you can then proceed with the restoration to the new website. Note, you will need to use the Restoration Path Changes feature if you are restoring your files to a different file location on the server.
If using the transfer backup method or if your database name for the new database is different then you will need to use the database path changes feature to adjust which database configuration your SQL files are associated to.
Help & Assistance
If you require any assistance restoring your backups, please contact us.
Did you find this page helpful?
 Yes Yes
 No No

|
|  |
 |
 |
Popular Questions
- Understanding file sizes (Bytes, KB, MB, GB, TB)
- Definitions: API, PHP, FTP, mySQL and more.
- WordPress Backup Plugin Installation Instructions
- API Configuration & Customisation (v1.6, 1.7)
- Failed Backup Errors and Trouble-Shooting
- API Configuration & Customisation (v2.2, v2.3)
- Why are the Euro and British Pounds Sterling costs based on the US Dollar cost?
- Getting Started Guide
- WordPress Multisite/Network Backup
- API Configuration & Customisation (v2.0, v2.1)
- Free Restoration Data Transfer Balance
- API Requirements
- Why should I worry about backing up my website?
- How are backups encrypted?
- Can I manage my backups for multiple websites with a single myRepono account?
|
|
|


